
JavaPerspective.com >
Intermediate Tutorials >
5. Graphical User Interfaces >
5.4. Layouts >
5.4.3. How to use GridLayout
5.4.3. How to use GridLayout
Last updated: 1 February 2013.
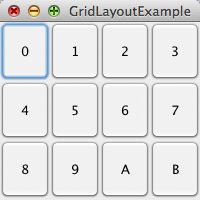
GridLayout places components in a grid that has a fixed number of rows and columns. All cells in the grid are equal in size and each added component takes all the available space in a cell. When the top-level container is resized, the cells are resized so that the grid takes all the available space. The following sample places buttons in a grid that has 3 rows and 4 columns:
import java.awt.GridLayout;
import javax.swing.JButton;
import javax.swing.JFrame;
import javax.swing.JPanel;
import javax.swing.SwingUtilities;
public final class GridLayoutExample extends JFrame {
public GridLayoutExample(){
init();
addComponents();
setDefaultCloseOperation(JFrame.EXIT_ON_CLOSE);
setVisible(true);
}
private void addComponents(){
JPanel panel = new JPanel();
panel.setLayout(new GridLayout(3, 4));
panel.add(new JButton("0"));
panel.add(new JButton("1"));
panel.add(new JButton("2"));
panel.add(new JButton("3"));
panel.add(new JButton("4"));
panel.add(new JButton("5"));
panel.add(new JButton("6"));
panel.add(new JButton("7"));
panel.add(new JButton("8"));
panel.add(new JButton("9"));
panel.add(new JButton("A"));
panel.add(new JButton("B"));
add(panel);
}
private void init(){
setTitle("GridLayoutExample");
setSize(200, 200);
setLocation(200, 100);
}
public static void main(String[] args){
SwingUtilities.invokeLater(new Runnable() {
public void run() {
new GridLayoutExample();
}
});
}
}
Here is the result:
When creating the GridLayout object, you can specify the number of columns (4 in the sample shown below) and set the number of rows to zero like this:
panel.setLayout(new GridLayout(0, 4));
In that case, the number of rows grows up as necessary as you add components. Likewise, you can specify only the number of rows and let the number of columns grow up as needed.
Note that you can specify the horizontal and vertical gap between components by invoking the methods setHgap(int hgap) and setVgap(int vgap).
You are here :
JavaPerspective.com >
Intermediate Tutorials >
5. Graphical User Interfaces >
5.4. Layouts >
5.4.3. How to use GridLayout
Next tutorial : JavaPerspective.com > Intermediate Tutorials > 5. Graphical User Interfaces > 5.4. Layouts > 5.4.4. How to use BorderLayout
Next tutorial : JavaPerspective.com > Intermediate Tutorials > 5. Graphical User Interfaces > 5.4. Layouts > 5.4.4. How to use BorderLayout