
JavaPerspective.com >
Intermediate Tutorials >
5. Graphical User Interfaces >
5.4. Layouts >
5.4.2. How to use BoxLayout
5.4.2. How to use BoxLayout
Last updated: 1 February 2013.
BoxLayout places components in a single row or in a single column. In the class BoxLayoutExample shown below, BoxLayout is used to place buttons vertically in a JPanel which is itself contained in a JFrame:
import java.awt.Component;
import java.awt.Container;
import java.awt.Dimension;
import javax.swing.BoxLayout;
import javax.swing.JButton;
import javax.swing.JFrame;
import javax.swing.JPanel;
public final class BoxLayoutExample extends JFrame {
public BoxLayoutExample(){
init();
addComponents();
setDefaultCloseOperation(JFrame.EXIT_ON_CLOSE);
setVisible(true);
}
private void addButton(String name, float alignment, Container container, int width, int height){
JButton button = new JButton(name);
button.setAlignmentX(alignment);
Dimension dimension = new Dimension(width, height);
button.setMaximumSize(dimension);
button.setMinimumSize(dimension);
button.setPreferredSize(dimension);
container.add(button);
}
private void addComponents(){
JPanel panel = new JPanel();
panel.setLayout(new BoxLayout(panel, BoxLayout.PAGE_AXIS));
addButton("1", Component.CENTER_ALIGNMENT, panel, 70, 50);
addButton("2", Component.CENTER_ALIGNMENT, panel, 70, 50);
addButton("3", Component.CENTER_ALIGNMENT, panel, 70, 50);
addButton("4", Component.CENTER_ALIGNMENT, panel, 70, 50);
addButton("5", Component.CENTER_ALIGNMENT, panel, 70, 50);
add(panel);
}
private void init(){
setTitle("BoxLayoutExample");
setSize(200, 400);
setLocation(200, 100);
}
}
The field PAGE_AXIS specifies that the buttons must be laid out according to the vertical orientation of the panel containing them. By default, the orientation is from top to bottom. The orientation of a container is language-sensitive. You can specify a container's vertical and horizontal orientation by calling the method setComponentOrientation provided by the class Component.
As you can see, I invoked the methods setMaximumSize, setMinimumSize and setPreferredSize for each button because depending on the size of the top-level container (the JFrame in this case), BoxLayout takes into account either the minimum, maximum or preferred size. Consequently, calling the 3 methods ensures that the buttons will have the requested size in all situations.
Here is the result:
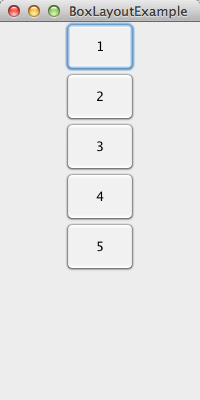
In the above picture, the first button is nearly touching the top edge of the window. The method createRigidArea provided by the class Box allows you to add space anywhere in the panel. For example, you can modify the method addComponents to add space between the top edge of the window and the first button as follows:
private void addComponents(){
JPanel panel = new JPanel();
panel.setLayout(new BoxLayout(panel, BoxLayout.PAGE_AXIS));
panel.add(Box.createRigidArea(new Dimension(0,20))); // add a 20 pixel vertical space
addButton("1", Component.CENTER_ALIGNMENT, panel, 70, 50);
addButton("2", Component.CENTER_ALIGNMENT, panel, 70, 50);
addButton("3", Component.CENTER_ALIGNMENT, panel, 70, 50);
addButton("4", Component.CENTER_ALIGNMENT, panel, 70, 50);
addButton("5", Component.CENTER_ALIGNMENT, panel, 70, 50);
add(panel);
}
The result follows:
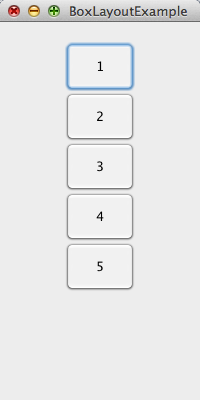
Still, the buttons are too close to each other and there is extra space between the last button and the bottom edge of the window. The method createVerticalGlue provided by the class Box can be called to put the extra space exactly where you want. For example, the extra space can be distributed between the buttons if you modify the method addComponents like this:
private void addComponents(){
JPanel panel = new JPanel();
panel.setLayout(new BoxLayout(panel, BoxLayout.PAGE_AXIS));
panel.add(Box.createVerticalGlue());
addButton("1", Component.CENTER_ALIGNMENT, panel, 70, 50);
panel.add(Box.createVerticalGlue());
addButton("2", Component.CENTER_ALIGNMENT, panel, 70, 50);
panel.add(Box.createVerticalGlue());
addButton("3", Component.CENTER_ALIGNMENT, panel, 70, 50);
panel.add(Box.createVerticalGlue());
addButton("4", Component.CENTER_ALIGNMENT, panel, 70, 50);
panel.add(Box.createVerticalGlue());
addButton("5", Component.CENTER_ALIGNMENT, panel, 70, 50);
panel.add(Box.createVerticalGlue());
add(panel);
}
The result is:
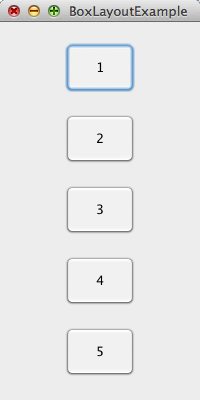
In the example above, you cannot control the amount of space that is distributed between the buttons when the window is resized. The more you enlarge the window, the more space you get between the buttons. You can use a filler to control the amount of space between components by specifying each space's maximum, minimum and preferred size. For example, in the sample shown below, I am specifying that the space between the buttons must have a maximum, minimum and preferred height of 20 pixels:
private void addComponents(){
JPanel panel = new JPanel();
panel.setLayout(new BoxLayout(panel, BoxLayout.PAGE_AXIS));
Dimension maximumSize = new Dimension(0, 20);
Dimension minimumSize = new Dimension(0, 20);
Dimension preferredSize = new Dimension(0, 20);
panel.add(new Box.Filler(minimumSize, preferredSize, maximumSize));
addButton("1", Component.CENTER_ALIGNMENT, panel, 70, 50);
panel.add(new Box.Filler(minimumSize, preferredSize, maximumSize));
addButton("2", Component.CENTER_ALIGNMENT, panel, 70, 50);
panel.add(new Box.Filler(minimumSize, preferredSize, maximumSize));
addButton("3", Component.CENTER_ALIGNMENT, panel, 70, 50);
panel.add(new Box.Filler(minimumSize, preferredSize, maximumSize));
addButton("4", Component.CENTER_ALIGNMENT, panel, 70, 50);
panel.add(new Box.Filler(minimumSize, preferredSize, maximumSize));
addButton("5", Component.CENTER_ALIGNMENT, panel, 70, 50);
panel.add(new Box.Filler(minimumSize, preferredSize, maximumSize));
add(panel);
}
As a result, even when you enlarge the window, the amount of space between the buttons does not change. Here is what you get:

You are here :
JavaPerspective.com >
Intermediate Tutorials >
5. Graphical User Interfaces >
5.4. Layouts >
5.4.2. How to use BoxLayout
Next tutorial : JavaPerspective.com > Intermediate Tutorials > 5. Graphical User Interfaces > 5.4. Layouts > 5.4.3. How to use GridLayout
Next tutorial : JavaPerspective.com > Intermediate Tutorials > 5. Graphical User Interfaces > 5.4. Layouts > 5.4.3. How to use GridLayout