
JavaPerspective.com >
Intermediate Tutorials >
5. Graphical User Interfaces >
5.4. Layouts >
5.4.6. How to use GridBagLayout
5.4.6. How to use GridBagLayout
Last updated: 1 February 2013.
GridBagLayout provides more flexibility than any other layout manager but it is arguably the most difficult one to use. Like GridLayout, it has a grid of cells. However, a component in a GridBagLayout can span more than one cell horizontally and/or vertically. Additionally, the rows and columns of the grid can have different sizes. The components' preferred sizes are used to determine each row's size and each column's size: the width of a column is the width of the biggest component in that column and the height of a row is the height of the biggest component in that row.
Each component in a GridBagLayout must be associated with a GridBagConstraints object that provides constraints including the location of the component in the grid, its resizing behaviour and also constraints about the number of cells the component spans in the grid. Typically, placing a component in a container whose layout manager is GridBagLayout involves 3 basic steps:
- Create a component and set its preferred size (and optionally its minimum size) to the desired value. The preferred size is taken into account by GridBagLayout although it is ignored if you make use of certain fields of the class GridBagConstraints as explained later on.
- Create a GridBagConstraints instance and set its fields to the desired values. Naturally, you only need to set the values of the fields of interest and leave the other fields to their default values. Those fields will be listed later in this tutorial.
- Invoke the method add(Component comp, Object constraints) provided by the class Container to add the component to the container. The argument constraints must be an instance of the class GridBagConstraints.
- The fields that are used for sizing and positioning.
- The fields that define extra space handling.
The section (1) shown below lists the fields that are used for sizing and positioning and also gives a basic example of how to use them. The section (2) lists the fields that define extra space handling. An example is provided in that section as well.
1. Fields for sizing and positioning
| Field | Description | ||
|---|---|---|---|
| gridx, gridy | gridx and gridy define the position of the component in the grid's coordinate space. For example, (gridx=0, gridy=0) is the top-left cell. (gridx=1, gridy=0) is the second cell in the first row. (gridx=0, gridy=1) is the first cell in the second row. The default value is GridBagConstraints.RELATIVE and it indicates that the component will be placed to the right of the previously added component (for gridx) or below the previously added component (for gridy). | ||
| gridwidth, gridheight | gridwidth defines the number of columns that the component spans in the grid and gridheight defines the number of rows the component spans. The default value for gridwidth and gridheight is 1. | ||
| ipadx, ipady | ipadx and ipady define the internal padding. You can use these fields to widen a component and thereby enlarge a row or column. The default value for ipadx and ipady is 0. If you set ipadx to a positive value, the component's column is enlarged (unless there is a bigger component in the same column). Likewise, a positive value for ipady enlarges the component's row (unless there is a bigger component in the same row). | ||
| insets | insets is an instance of the class Insets that defines the external padding. You can use this field if you want space between the component and the edge of the next component or between the component and the edge of its container. | ||
| anchor | The display area of a component is the cell or group of cells the component spans. When a component does not fill entirely its display area, you can use the field anchor to spefify the location of the component within its display area. The default value is GridBagConstraints.CENTER. The other possible values are FIRST_LINE_START, PAGE_START, FIRST_LINE_END, LINE_START, LINE_END, LAST_LINE_START, PAGE_END, and LAST_LINE_END. | ||
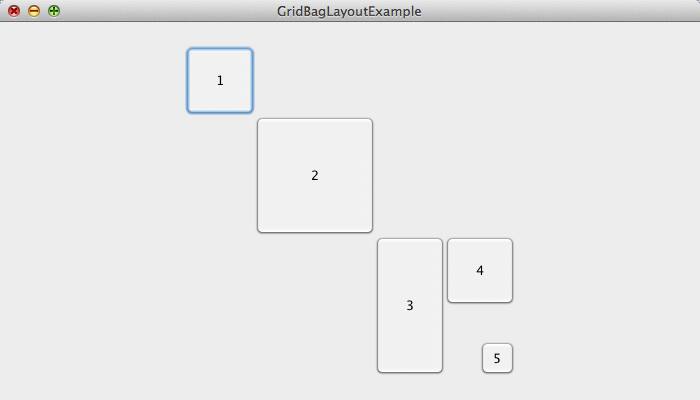
The following picture shows a basic example of a GUI that uses some of the fields listed above. As you can see, the GUI contains 5 buttons. The button 2 is in a cell that is larger than the other cells of the grid. Each button spans a single cell except the button 3 which spans two cells vertically. The button 5 is the smallest one and it is placed at the bottom-right corner of its cell.
Here is the code:
import java.awt.Dimension;
import java.awt.GridBagConstraints;
import java.awt.GridBagLayout;
import javax.swing.JButton;
import javax.swing.JFrame;
import javax.swing.JPanel;
import javax.swing.SwingUtilities;
public final class GridBagLayoutExample extends JFrame {
public GridBagLayoutExample(){
init();
addComponents();
setDefaultCloseOperation(JFrame.EXIT_ON_CLOSE);
setVisible(true);
}
private void addComponents(){
JPanel panel = new JPanel();
panel.setLayout(new GridBagLayout());
// ---------------------------- Button 1 ---------------------------------------------------
// -------------------------------------------------------------------------------------------
// Create the button 1 and set its preferred size
JButton button1 = new JButton("1");
button1.setPreferredSize(new Dimension(70, 70));
// Create a GridBagConstraints object to place the button 1 in the top-left cell of the grid
GridBagConstraints button1Constraints = new GridBagConstraints();
button1Constraints.gridx = 0;
button1Constraints.gridy = 0;
// Add the button 1 to the GUI
panel.add(button1, button1Constraints);
// ---------------------------- Button 2 ---------------------------------------------------
// -------------------------------------------------------------------------------------------
// Create the button 2 and set its preferred size
JButton button2 = new JButton("2");
button2.setPreferredSize(new Dimension(70, 70));
// Create a GridBagConstraints object for the button 2
GridBagConstraints button2Constraints = new GridBagConstraints();
button2Constraints.gridx = 1; // second column
button2Constraints.gridy = 1; // second row
button2Constraints.ipadx = 50; // enlarge the button's column (the preferred width is ignored)
button2Constraints.ipady = 50; // enlarge the button's row (the preferred height is ignored)
// Add the button 2 to the GUI
panel.add(button2, button2Constraints);
// ---------------------------- Button 3 ---------------------------------------------------
// -------------------------------------------------------------------------------------------
// Create the button 3 and set its preferred size
JButton button3 = new JButton("3");
button3.setPreferredSize(new Dimension(70, 140));
// Create a GridBagConstraints object for the button 3
GridBagConstraints button3Constraints = new GridBagConstraints();
button3Constraints.gridx = 2; // third column
button3Constraints.gridy = 2; // third row
button3Constraints.gridheight = 2; // the button spans 2 rows
// Add the button 3 to the GUI
panel.add(button3, button3Constraints);
// ---------------------------- Button 4 ---------------------------------------------------
// -------------------------------------------------------------------------------------------
// Create the button 4 and set its preferred size
JButton button4 = new JButton("4");
button4.setPreferredSize(new Dimension(70, 70));
// Create a GridBagConstraints object for the button 4
GridBagConstraints button4Constraints = new GridBagConstraints();
button4Constraints.gridx = 3; // fourth column
button4Constraints.gridy = 2; // third row
// Add the button 4 to the GUI
panel.add(button4, button4Constraints);
// ---------------------------- Button 5 ---------------------------------------------------
// -------------------------------------------------------------------------------------------
// Create the button 5 and set its preferred size
JButton button5 = new JButton("5");
button5.setPreferredSize(new Dimension(35, 35));
// Create a GridBagConstraints object for the button 5
GridBagConstraints button5Constraints = new GridBagConstraints();
button5Constraints.gridx = 3; // fourth column
button5Constraints.gridy = 3; // fourth row
button5Constraints.anchor = GridBagConstraints.LAST_LINE_END; // place the button at the bottom-right corner of its cell
// Add the button 5 to the GUI
panel.add(button5, button5Constraints);
// Add the panel to the JFrame
add(panel);
}
private void init(){
setTitle("GridBagLayoutExample");
setSize(700, 400);
setLocationRelativeTo(null);
}
public static void main(String[] args){
SwingUtilities.invokeLater(new Runnable() {
public void run() {
new GridBagLayoutExample();
}
});
}
}
You might have noticed that the components are centered in their container (the JPanel). In fact, the grid of cells itself is placed at the center of the JPanel. Furthermore, if you enlarge the window, the buttons remain centered and their sizes are unchanged. That's because no extra space handling was specified, which may be acceptable for certain kinds of applications.
However, if you want to specify the extra space handling, you must also use the fields of the class GridBagConstraints listed in the next section.
2. Fields that define extra space handling
| Field | Description | ||
|---|---|---|---|
| weightx, weighty | weightx and weighty define how the extra space is distributed among the rows and columns of the grid. As I said earlier, the extra space is the available space you get when the components of a GUI do not fill entirely their container. If no extra space handling is specified, the grid of cells is placed at the center of its container because all the extra space is placed between the grid and the edges of its container. The fields weightx and weighty range from 0 to 1 and the default value is 0 (no extra space handling). A value greater than 0 for weightx determines the amount of extra space a column takes up. For example, if you set weightx to 0.5 for only one component, the column or group of columns the component spans takes up all the extra space. If you set weightx to a value greater than 0 for other columns as well, the extra space is distributed accordingly among the columns. The higher weightx is, the more extra space the column takes up. In case a component spans multiple columns, the specified weightx value is divided between the columns. If you set weightx for multiple components in the same column, then the column's weightx value is the weightx of the biggest component in that column. Similarly, weighty specifies how the extra space is distributed among the rows of the grid. |
||
| fill | As you might already know, the display area of a component is the cell or group of cells the component spans. When a component is smaller than its display area, this field specifies how the component fills the available space within its display area. The possible values are GridBagConstraints.NONE, GridBagConstraints.HORIZONTAL, GridBagConstraints.VERTICAL and GridBagConstraints.BOTH. The default value is GridBagConstraints.NONE. GridBagConstraints.HORIZONTAL indicates that the component will take up all the available horizontal space within its display area. Likewise, GridBagConstraints.VERTICAL indicates that the component will take up all the vertical space within its display area. Finally, GridBagConstraints.BOTH indicates that the component will fill its display area both horizontally and vertically. |
||
The next sample is the code example provided in the first section (1) in which extra space handling was added. The idea is that the button 1 takes up more extra space than the other buttons. The rest of the extra space is evenly distributed between the buttons 2, 3, 4 and 5. Each button fills its display area both horizontally and vertically except the button 5 which does not fill its display area.
import java.awt.Dimension;
import java.awt.GridBagConstraints;
import java.awt.GridBagLayout;
import javax.swing.JButton;
import javax.swing.JFrame;
import javax.swing.JPanel;
import javax.swing.SwingUtilities;
public final class GridBagLayoutExample2 extends JFrame {
public GridBagLayoutExample2(){
init();
addComponents();
setDefaultCloseOperation(JFrame.EXIT_ON_CLOSE);
setVisible(true);
}
private void addComponents(){
JPanel panel = new JPanel();
panel.setLayout(new GridBagLayout());
// ---------------------------- Button 1 ---------------------------------------------------
// -------------------------------------------------------------------------------------------
// Create the button 1 and set its preferred size
JButton button1 = new JButton("1");
button1.setPreferredSize(new Dimension(70, 70));
// Create a GridBagConstraints object to place the button 1 in the top-left cell of the grid
GridBagConstraints button1Constraints = new GridBagConstraints();
button1Constraints.gridx = 0;
button1Constraints.gridy = 0;
button1Constraints.weightx = 0.9; // the button 1 takes up more horizontal extra space than the other buttons
button1Constraints.weighty = 0.9; // the button 1 takes up more vertical extra space than the other buttons
button1Constraints.fill = GridBagConstraints.BOTH; // fill the display area both horizontally and vertically
// Add the button 1 to the GUI
panel.add(button1, button1Constraints);
// ---------------------------- Button 2 ---------------------------------------------------
// -------------------------------------------------------------------------------------------
// Create the button 2 and set its preferred size
JButton button2 = new JButton("2");
button2.setPreferredSize(new Dimension(70, 70));
// Create a GridBagConstraints object for the button 2
GridBagConstraints button2Constraints = new GridBagConstraints();
button2Constraints.gridx = 1; // second column
button2Constraints.gridy = 1; // second row
button2Constraints.ipadx = 50; // enlarge the button's column (the preferred width is ignored)
button2Constraints.ipady = 50; // enlarge the button's row (the preferred height is ignored)
button2Constraints.weightx = 0.3; // take up a little horizontal extra space
button2Constraints.weighty = 0.3; // take up a little vertical extra space
button2Constraints.fill = GridBagConstraints.BOTH; // fill the display area both horizontally and vertically
// Add the button 2 to the GUI
panel.add(button2, button2Constraints);
// ---------------------------- Button 3 ---------------------------------------------------
// -------------------------------------------------------------------------------------------
// Create the button 3 and set its preferred size
JButton button3 = new JButton("3");
button3.setPreferredSize(new Dimension(70, 140));
// Create a GridBagConstraints object for the button 3
GridBagConstraints button3Constraints = new GridBagConstraints();
button3Constraints.gridx = 2; // third column
button3Constraints.gridy = 2; // third row
button3Constraints.gridheight = 2; // the button spans 2 rows
button3Constraints.weightx = 0.3; // take up a little horizontal extra space
button3Constraints.weighty = 0.3; // take up a little vertical extra space
button3Constraints.fill = GridBagConstraints.BOTH; // fill the display area both horizontally and vertically
// Add the button 3 to the GUI
panel.add(button3, button3Constraints);
// ---------------------------- Button 4 ---------------------------------------------------
// -------------------------------------------------------------------------------------------
// Create the button 4 and set its preferred size
JButton button4 = new JButton("4");
button4.setPreferredSize(new Dimension(70, 70));
// Create a GridBagConstraints object for the button 4
GridBagConstraints button4Constraints = new GridBagConstraints();
button4Constraints.gridx = 3; // fourth column
button4Constraints.gridy = 2; // third row
button4Constraints.weightx = 0.3; // take up a little horizontal extra space
button4Constraints.weighty = 0.3; // take up a little vertical extra space
button4Constraints.fill = GridBagConstraints.BOTH; // fill the display area both horizontally and vertically
// Add the button 4 to the GUI
panel.add(button4, button4Constraints);
// ---------------------------- Button 5 ---------------------------------------------------
// -------------------------------------------------------------------------------------------
// Create the button 5 and set its preferred size
JButton button5 = new JButton("5");
button5.setPreferredSize(new Dimension(35, 35));
// Create a GridBagConstraints object for the button 5
GridBagConstraints button5Constraints = new GridBagConstraints();
button5Constraints.gridx = 3; // fourth column
button5Constraints.gridy = 3; // fourth row
button5Constraints.anchor = GridBagConstraints.LAST_LINE_END; // place the button at the bottom-right corner of its cell
button5Constraints.weightx = 0.3; // take up a little horizontal extra space
button5Constraints.weighty = 0.3; // take up a little vertical extra space
// Add the button 5 to the GUI
panel.add(button5, button5Constraints);
// Add the panel to the JFrame
add(panel);
}
private void init(){
setTitle("GridBagLayoutExample");
setSize(700, 400);
setLocationRelativeTo(null);
}
public static void main(String[] args){
SwingUtilities.invokeLater(new Runnable() {
public void run() {
new GridBagLayoutExample2();
}
});
}
}
Here is the result:

If you enlarge the window, all the buttons (except the button 5) get larger as more extra space is available. Note that a component's preferred size is ignored if you make it fill its display area horizontally and/or vertically.
You are here :
JavaPerspective.com >
Intermediate Tutorials >
5. Graphical User Interfaces >
5.4. Layouts >
5.4.6. How to use GridBagLayout
Next tutorial : JavaPerspective.com > Intermediate Tutorials > 5. Graphical User Interfaces > 5.5. Colors and fonts
Next tutorial : JavaPerspective.com > Intermediate Tutorials > 5. Graphical User Interfaces > 5.5. Colors and fonts